- Import appliance
- Login credentials
- Netplan addressing
- Windows PowerShell SSH
- Automation test scripts
- Lab topology example
- How to run Ansible playbooks
- How to run Python scripts
- ChatGPT tips and tricks
Automation Node is a Ubuntu-based full automation appliance for GNS3. The network automation node includes automation software for multi-vendor labs. There are Ansible playbooks and Python scripts included as well that are based on Cisco devices.
- Python3
- Ansible
- Netmiko
- Napalm
- requests
- ncclient
- pyeapi (Arista)
- OpenSSH Server
- pyinstaller
Download automation node
Download the .gns3a template file that is used to import appliance into GNS3. The YAML template file automation-node.gns3a is saved to your downloads directory.
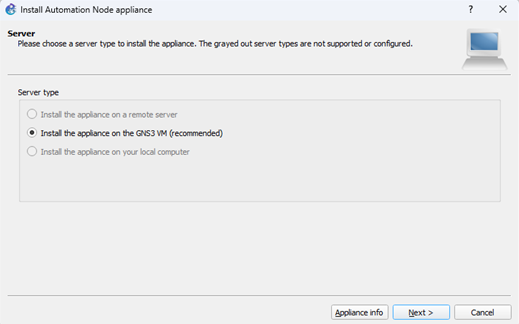
Import appliance
Start GNS3 and select File -> Import Appliance, then browse to the downloads directory and select automation-node.gns3a file. This will start import appliance wizard to download automation-node.qcow2 image and add the appliance to your End Devices group.
Click Next to install appliance on GNS3 VM
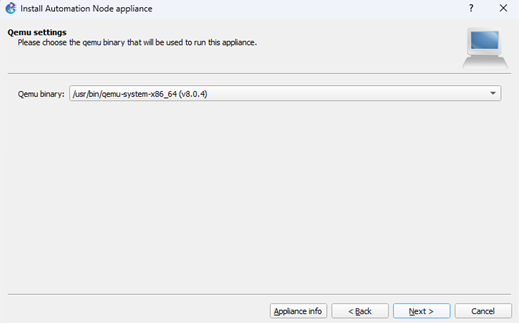
Click Next to accept default Qemu binary file.
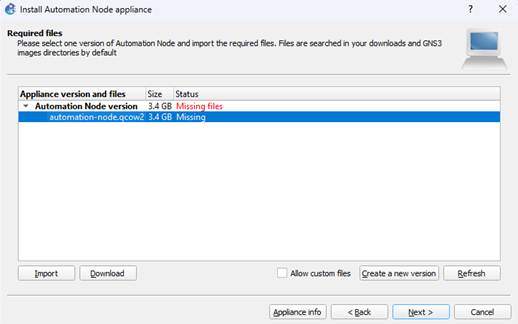
Select automation-node.qcow2 in dialog box and click Download button. Since GNS 2.2.55+ the image download is automatic if missing from VMware.
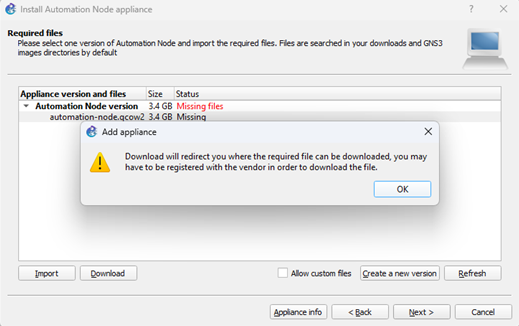
Click OK to start file download and click Refresh button after 1-2 minutes. You can also monitor download and click Refresh when it is done.
The file status will change from missing to ready when done.

Select Automation Node version in dialog box and click Next.
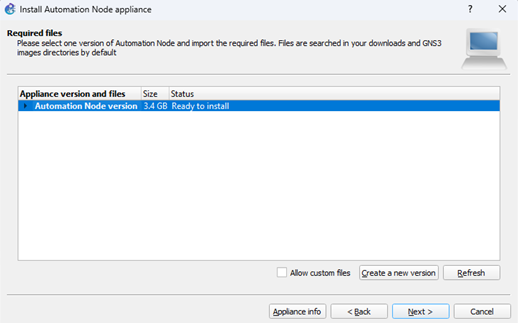
Click Yes to install automation node appliance. Go to End Devices group and verify automation appliance is listed.

Custom symbol

Download the custom appliance symbol then select End Devices group, right-click Automation Node appliance and select configure template. Click symbol browse button and select use a custom symbol. Browse to your downloads directory and select automation-node.png file. Open a lab and drag the automation appliance onto workspace.
Account login credentials
Automation node default account has sudo level security access.
username: ubuntu / password: automation
DHCP IP addressing
Ubuntu Netplan is configured to obtain an IP address from a DHCP server by default. This includes either Cloud node, NAT node, or any other DHCP server in your lab topology.
Static IP configuration (optional only)
You can optionally configure a persistent static IP address and default gateway on the automation node instead of DHCP. There is a file named static-ip.yaml located in your home directory that can be copied to /etc/netplan/ directory for this purpose.
ubuntu@automation-node:~$ ls
ubuntu@automation-node:~$ sudo mv ~/static-ip.yaml /etc/netplan/
ubuntu@automation-node:~$ cd /etc/netplan/
Edit static-ip.yaml file with nano editor to modify IP address and default gateway based on your lab. Press Ctrl-O and Enter to write changes, then Ctrl-X to exit nano editor. Run sudo netplan generate and sudo netplan apply commands to update Netplan settings.
ubuntu@automation-node:~$ sudo nano static-ip.yaml
ubuntu@automation-node:~$ sudo netplan generate
ubuntu@automation-node:~$ sudo netplan apply
Windows PowerShell SSH access (recommended)
The preferred method to access automation control node is from Windows PowerShell via SSH. This is recommended since PowerShell has Windows style terminal navigation, text readability, and easy to copy/paste text blocks. Creating your own scripts will require copy and paste from ChatGPT to Ubuntu nano editor. There is also copy and paste of script errors from Ubuntu to ChatGPT for troubleshooting or refactoring. Attempting to do this from within Ubuntu basic terminal is an exercise in frustration to say the least.
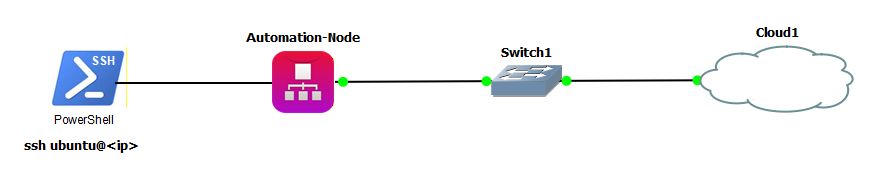
(automation-venv) ubuntu@automation-node:~$ ip aPS C:\Users\>ssh ubuntu@ip addressPS C:\Users\>ubuntu@ip address password: automationAutomation test scripts
GNS3 automation appliance includes the following directory structure for Ansible playbooks and Python scripts. Ansible playbooks are coded to use vault feature for SSH password encryption using password cisco. Python scripts use getpass feature in scripts for the same purpose.
*Do not test and/or debug any lab scripts included here in your production environment.
~/scripts/ansible
├── hosts.ini
├── vault.yaml
├── ping_check.yaml
├── ssh_connect_test.yaml
├── cisco_backups.yaml
├── vlan_config.yaml
├── etherchannel.yaml
├── loopback_interface.yaml
├── syslog.yaml
├── extended_acl.yaml
├── enable_secret_compliance.yaml
├── switch_status_check.yaml
├── post_deployment_check.yaml
├── /reports
├── /cisco_backups
~/scripts/python
├── devices.txt
├── switches.txt
├── ping_check.py
├── ssh_connect_test.py
├── interface_status.py
├── cisco_firmware_scan.py
├── encryption_compliance.py
├── switch_post_deployment_check.py
├── /reports
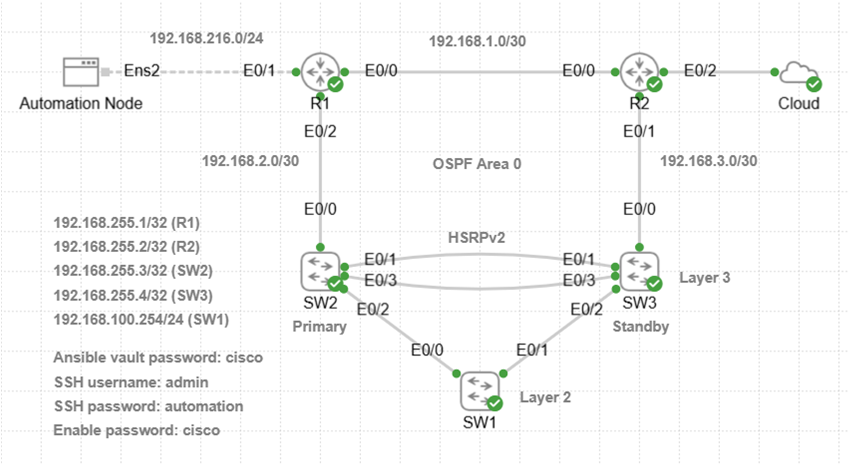
Automation lab topology example
Download and unzip the Cisco device scripts used with CML lab and create your own GNS3 automation lab. You will have to run crypto key generate rsa command on all devices to enable SSH. Press Enter at the prompt to configure the default 2048 bit key length modulus. Connect the automation node to a router in the same subnet or an access switch that can access all network devices.
The device configuration scripts are based on a partially configured lab. Run all Ansible playbooks (vlan_config.yaml etc.) to complete the lab configuration. Python scripts provide compliance and status checks. For best results, run playbooks and scripts in the order they are listed and verify any reports generated.
How to run Ansible playbooks
The following commands are used to run Ansible playbooks from Ubuntu control node. Ansible hosts.ini file is mandatory since it provides hostname and IP address of Cisco devices. The only Ansible playbook that does not use vault password is ping_check.yaml since there is no SSH login. Run Ansible playbooks from home/scripts/ansible directory and include –ask-vault-pass keyword for vault password. All text reports are saved to reports directory except cisco_backups and viewed with cat |more command. Start with SSH from PowerShell to Ubuntu based on your Linux username and IP address that VMware assigned to your VM. (e.g., 192.168.216.128)
ssh username@ip address
(automation-venv) ubuntu@automation-node:~$ clear
(automation-venv) ubuntu@automation-node:~$ ls -l
(automation-venv) ubuntu@automation-node:~$ cd scripts/ansible
(automation-venv) ubuntu@automation-node:~$ ansible-playbook -i hosts.ini ping_check.yaml
(automation-venv) ubuntu@automation-node:~$ ansible-playbook -i hosts.ini ssh_connect_test.yaml —ask-vault-pass
Vault password: cisco
How to run Python scripts
The following commands are used to run Python scripts from Ubuntu control node. You will be prompted for SSH username and password used for Cisco device login. There are devices.txt and switches.txt host files with hostname and IP address used by scripts. Run Python scripts from home/scripts/python directory. All .txt/.html reports are saved to reports directory and viewed with cat |more command.
(automation-venv) ubuntu@automation-node:~$ cd scripts/python
(automation-venv) ubuntu@automation-node:~$ python3 cisco_firmware_scan.py
SSH username: admin
SSH password: automation
ChatGPT prompt engineering tips and tricks
Ansible playbooks and Python scripts provided were 100% created with ChatGPT. Learn how to develop and test network automation scripts with ChatGPT. You can generate and troubleshoot scripts in seconds that would otherwise take you hours or days if at all.
Creating Ansible playbooks and Python scripts
Creating automation scripts with ChatGPT is an iterative process of prompt, test, debug, and validate. You will have ChatGPT debug errors along with how scripts are run and reports. This is common and results from prompts with missing details or context.
Prompt Engineering: The responses from ChatGPT are only as good as the prompts you input. Each prompt should provide context that includes your current setup and what you want to accomplish. This should include virtualization software, automation tools, hosts file, and Cisco network details for example. Then include functional requirements to define an effective prompt that ChatGPT can use to create script.
Context Example: VMware, Ubuntu Server control node 24.04, ansible vault enabled, SSH connect to Cisco devices, IOS-XE, IP addressing, paste hosts.ini file or python hosts file.
Functional Requirements Example: ansible playbook, backup startup configuration, explain purpose of script or paste IOS command/s, report format (.txt/html) and directory, security issues, addressing, cisco module features, verify updates, and save configuration.
Step 1: ChatGPT Prompt
My current setup is VMware with Ubuntu server control node that connects via SSH to Cisco devices running IOS-XE. Ansible vault.yaml is already configured with encrypted SSH password and enable secret password. This is my hosts.ini file for reference. Create an Ansible playbook based on this pasted hosts.ini file. The script should backup startup configuration first and then configure service password encryption on all devices from all_cisco inventory group. Print the results to terminal and also a text report saved to ~/scripts/ansible/reports directory. Save the running configuration and use Cisco module that supports idempotency, error checking, and configuration validation.
Step 2: Copy/Paste Script to Nano Editor
Start Ubuntu nano editor with the name of your new Ansible playbook or Python script. Paste the code copied from ChatGPT grey box to nano editor with right-click. Save the file with Ctrl-O and hit Enter to confirm write. Exit nano editor with Ctrl-X and return to Ubuntu command line.
(automation-venv) ubuntu@automation-node:~$ nano playbook.yaml
Step 3: Run Script
Create an automation lab where preliminary testing and debugging of scripts can be done without affecting the production network. It is recommended to have hosts file in the local working directory.
Step 4: Debug Script
Any error messages can be copied to ChatGPT for analysis and to modify script. There are often issues with how script runs and reports that do not necessarily generate error messages. Ask ChatGPT for a full modified playbook or script since mistakes are often made with pasting snippets into original script.
Step 5: Post-Run Validation Test Plan
Some examples of functional tests include HSRP failover, interface shutdown for routing behavior, or performance tests. You could verify Syslog operation for example by shutting down an interface and run cat /var/log/syslog command. This Ubuntu command will list the interface down system message generated at bottom of log. ACL tests are another example that involves sending destination traffic and verify filtering is working correctly.
ChatGPT Prompt: Python
My current setup is VMware with Ubuntu Server 24.04 control node that connect via SSH to Cisco L2 and L3 switches running IOS-XE. This is hosts file called switches.txt pasted here that lists IP addresses of switches. Python script must be implemented with getpass to prompt for SSH password and secret enable password. This is a security policy so that no device passwords are hard-coded in script. The script should backup startup configuration first and then parse running configuration to check if enable secret command is present on all target devices. Print the results to terminal and also a text compliance report saved to ~/scripts/python/reports directory.