This article explains how to install Cisco Modeling Labs free version. Learn how Network as Code (NaC) is used to import and share Cisco labs based on a YAML-generated text file. This makes sharing labs much easier than with large GNS3 or EVE-NG binary files.
Disable Microsoft Hyper-V
VMware Workstation and Microsoft Hyper-V are not compatible on Windows Home Edition or Windows Pro. You will get a nested virtualization not supported error when starting CML with VMware. Nested virtualization enables Cisco IOS devices to run as separate VMs within CML.
Hyper-V is a Type 1 hypervisor that exclusively manages all hardware virtualization and prevents CML from using nested virtualization with VMware. The same problem will occur when using GNS3 and EVE-NG with VMware. This was tested with VMware Workstation 17.5 installed on Windows 11 Home and Windows 11 Pro. There are separate instructions included for both operating systems.
Disable Hyper-V (Windows Home Edition)
There is only partial support for Hyper-V included with Windows Home Edition. This makes it easier to disable Hyper-V and allow VMware to work correctly with Cisco CML.
Start Windows PowerShell as Administrator and type the following command to disable Hyper-V launch from Windows. Hint: If you don’t know how to start Windows PowerShell as Administrator ask ChatGPT.
bcdedit /set hypervisorlaunchtype off
Uncheck the following features to disable Hyper-V components in Control Panel and then restart your computer:
Control Panel -> Select Programs -> Select Turn Windows Features on or off
1. Uncheck Virtual Machine Platform
2. Uncheck Windows Hypervisor Platform
3. Uncheck Windows Subsystem For Linux
Memory Integrity Setting:
Type core isolation in Windows search bar, select core isolation, and turn Memory Integrity setting OFF. You will have to restart your computer then continue with lab setup.
Disable Hyper-V (Windows Pro)
This article explains how to fully disable Hyper-V on a machine with Windows Pro. Since Hyper-V is fully supported with Windows Pro, this makes it more complex to disable all Hyper-V components. ChatGPT can provide instructions on how to reinstall Hyper-V software at a later date if VMware is uninstalled.
Install VMware Workstation
Start with VMware Workstation install using the default settings. Skip this step if VMware Workstation 17+ is already installed and proceed to VMware DHCP configuration.
- Go to support.broadcom.com and log in (or register a free account with valid email)
- In the top-right corner, select “Support Portal”, then:
- Choose the VMware Cloud Foundation division.
- Click My Downloads.
- Search for “Workstation Pro”.
- Click on the product and choose the “Personal Use” (same binaries).
- Be sure to check the “I agree to the Terms and Conditions” box – it unlocks the download
- Choose the latest version (e.g., Workstation Pro 17.5.2+ or newer).
- Download and install VMware
- DO NOT install Windows Hypervisor Platform (WHP) option (leave it unchecked).
- On launch, select “Personal Use” if prompted — no license key needed.
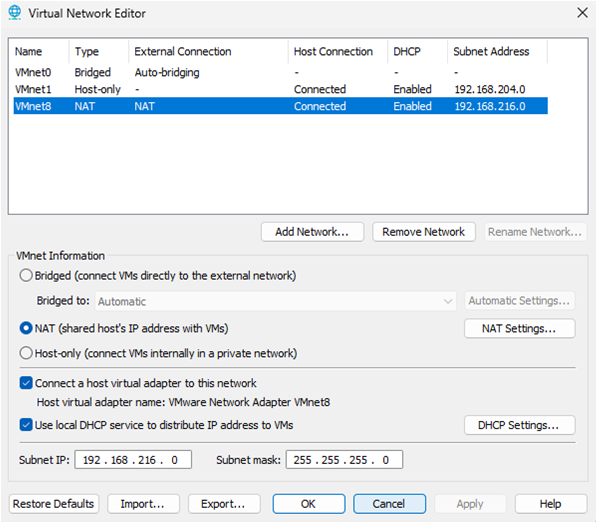
VMware DHCP configuration settings
The current version of VMware typically assigns 192.168.216.0/24 subnet by default to NAT network (VMnet8). This is used for internet access and communication between VMs within VMware.
Verify / Update VMware DHCP
iPerf3 labs have ext-conn that connects to VMware default gateway (192.168.216.2/24). Ubuntu nodes are assigned to the same subnet for installing iPerf3 on client and server. The first step is to verify that VMware is using 192.168.216.0/24 subnet and if not then modify accordingly or select cancel. This update will typically have no effect on any existing VMs since DHCP will change IP addressing seamlessly.
- Select VMware Edit Menu
- Select Virtual Network Editor
- Change settings (administrator)
- Select VMnet8
- Subnet IP: 192.168.216.0 Subnet mask: 255.255.255.0
- Modify and restart VM or cancel if 192.168.216.0/24 already configured
Install Cisco Modeling Labs (CML-Free)
Cisco Modeling Labs includes a free tier version with 5-node limit. Learn how to create labs and test on real Cisco IOS. The is preferrable to emulated lab environments such as GNS3 and EVE-NG that are error prone and more complex to setup similar labs. You can also upgrade to CML Personal and use it for lab testing at work and certification study. Share labs with YAML text file instead of large binary project files used by GNS3 and EVE-NG.
- Create lab topologies and test on Cisco approved IOS.
- Less complex or error prone than GNS3 or EVE-NG.
- Share labs with a YAML text file.
- Upgrade to CML Personal for additional nodes.
This section explains how to install Cisco Modeling Labs (v2.8) to VMware Workstation and import a lab-ready (Network as Code) topology.
Download CML files from Cisco
Step 1: You will need to first register for a Cisco CCO account. Skip this step if you already have an existing account.
Step 2: Navigate to the CML-Free Sign-up page to register for access to CML-Free.
https://mkto.cisco.com/cml-free.html
Step 3: Navigate to Cisco Software Download and login with your Cisco CCO account.
https://software.cisco.com/download/home
Step 4: Select Modeling Labs on right side-bar and then select CML-Free 2.8 release. The following CML files are for VMware and have been tested with CML 2.8 stable version.
Download CML 2.8.0 server software = cml2_2.8.0-6_amd64-32.ova
Download CML IOS reference platform (images) = refplat-20241016-fcs-iso.zip
Configure CML virtual machine
Step 5: Navigate to your Windows download directory. Close any existing VPN connection.
Step 6: Extract refplat-20241016-freetier-iso.zip to a folder for install.
Step 7: Right-click on cml2_f_2.8.1-14_amd64-35.ova and select Open with VMware Workstation.
Step 8: Follow prompts in the VMware Import Wizard.
Select VMware for personal use
Name for new virtual machine: CML
Storage path: default and select Import
Step 9: CML Virtual Machine settings will open (Do NOT start VM).
Step 10: Cisco CML VM minimum system requirement is 4 processors and 1 core per processor. This can be increased to 6 processors and 1 core per processor if supported with your machine hardware.
Number of processors = 4
Number of cores per processor = 1
Check Virtualize Intel VT-x/EPT or AMD-V/RVI

Memory
Cisco CML VM must be assigned at least 8 GB of memory. You can install CML on a machine with 8 GB physical memory however disk swapping will slow performance. The following are recommended guidelines for VM memory to optimize performance. For example, if your laptop has 16 GB physical memory then assign 12 GB (12288 MB) memory to CML VM. That will leave 4 GB memory available for host applications including VMware.
16 GB physical memory = 12288 MB (CML VM)
32 GB physical memory = 24576 MB (CML VM)

Hard Disk
Expand disk capacity to 100 GB minimum recommended and ignore message. The disk size will automatically resize when virtual machine is started. This is a maximum size only with thin provisioning that assigns disk space based on usage.

CD/DVD
Check the ‘use ISO image file’ check box. Browse to your downloads directory and open refplat-20241016-freetier-iso folder. Select refplat-20241016-freetier file.

Check the ‘Connect at power on‘ check box.
Network Adapter: Select NAT

Step 11: Power on virtual machine and accept EULA (use arrow and tab keys).
CML application setup
Step 12: Confirm standalone all-in-one deployment.
Step 13: Enter system unique hostname: cml-controller (default)
Step 14: Create sysadmin account and assign password. Select yes to ignore password warnings.
Step 15: Create user admin account and assign password to access CML labs via Web UI. Select yes to ignore password warnings.
Step 16: Select continue for DHCP (default) to configure IPv4 addressing from VMware. This only applies to external connections such as the internet or Inter-VM links.
Step 17: Confirm settings. CML will start copying refplat images at this point for Cisco devices. This could take several minutes to copy images based on your laptop speed. Select Continue button and wait for CML server to reset.
Step 18: Access CML UI from your browser with DHCP assigned IP address shown in the CML VM console (ignore 9090). Select Advanced button to ignore any SSL certificate warnings, and select Proceed.
This command is an example with CML default username admin and password you created when installing CML. The assigned IP address is an example only and could be different.
https://192.168.216.129
Username: admin
Password: **********