Nmap is a network discovery and troubleshooting tool used by network engineers. Labs include host discovery, port scanning, and service detection. There is also ACL validation testing and firewall rule analysis. Learn how to scan real Cisco IOS devices and Linux data center servers. Download this Nmap cheat sheet that explains command line options and features.
Nmap Lab Topics
- Host Discovery
- Port Scanning
- Service Detection
- OS Fingerprinting
- ACL Validation
- Firewall Rule Analysis
Install Cisco CML Free Version Software
Cisco CML free version enables scanning of real Cisco IOS devices with Nmap. The article includes installation of VMware (free) and how to configure the correct DHCP subnet using virtual editor. Installing Cisco CML also provides access to automation labs and tcpdump labs available soon.
Cisco CML Free Version Install
Lab Setup and Software Install
The following instructions apply to initial lab setup only so that software is installed on Ubuntu nodes. Keep your laptop plugged in at all times when running Nmap labs for best performance and follow instructions in the correct order.
Step 1: Click on link to download Nmap lab to your downloads directory for import to Cisco CML. This is a YAML text file (IaC) used to create the lab topology shown.
Step 2: Access CML UI from your browser with DHCP assigned IP address shown in the CML VM console (ignore 9090). Select Advanced button to ignore any SSL certificate warnings, and select Proceed.
This command is an example with CML default username admin and password you created when installing CML. The assigned IP address is only an example and could be different.
https://192.168.216.129
Username: admin
Password: **********
Step 3: Select Import and browse to your downloads directory. Select Nmap.yaml file and import into CML.
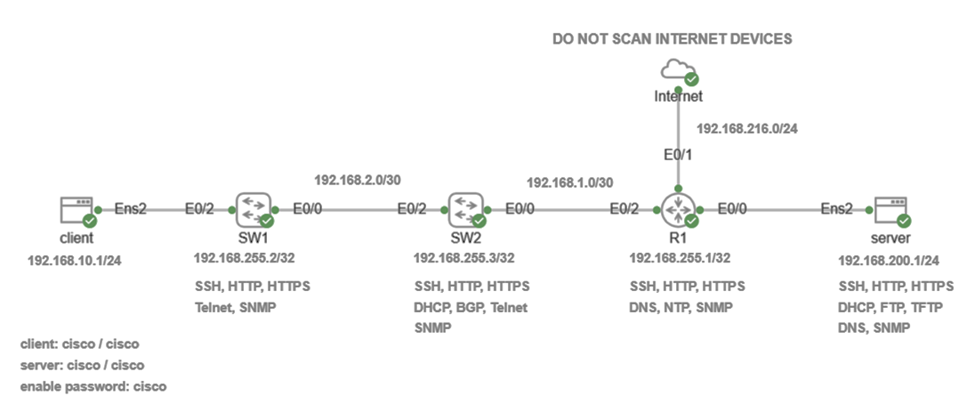
Step 4: Start Internet node and Cisco devices manually first with right-click start option. Wait for green check mark to appear for all nodes.
Step 5: Start Ubuntu client node manually with right-click start option. Monitor install from console and wait for cloud-init to finish. The initial install will take approximately 2-3 minutes to configure IP addressing, update packages, and install Nmap on Ubuntu client.
[ OK ] Finished cloud-final.service – Cloud-init: Final Stage.
[ OK ] Reached target cloud-init.target – Cloud-init target.
Hit Enter for login
username: cisco
password: cisco
nmap –version
Step 6: Start Ubuntu server node only after Ubuntu client is finished. Monitor install from console and wait for cloud-init to finish. The initial install will take approximately 2-3 minutes to configure IP addressing, update packages, and install Nmap on Ubuntu server.
[ OK ] Finished cloud-final.service – Cloud-init: Final Stage.
[ OK ] Reached target cloud-init.target – Cloud-init target.
Hit Enter for login
username: cisco
password: cisco
nmap –version
Step 7: Console to each Cisco device and create SSH key since they are not imported automatically. Press enter key to accept the default 2048 bit key length.
device>enable
Password: cisco
device(config)#crypto key generate rsa
Choose the size of the key modulus. How many bits in the modulus (2048): Enter
Save the running configuration to startup configuration on each device.
device#copy run start
Step 8: Select LAB menu item from top of workspace and click stop lab after login to client and server.
*Restart CML VM on slower machines after install since this lab installs a lot of software. This is only done once to reset Ubuntu nodes after install and enable caching of disk images for faster performance.
*CML prevents automatic launch of all nodes when CPU overutilization occurs on slower machines (8 GB RAM). Right-click start on any node if green check mark does not appear within 1-2 minutes.
Lab 1: Host Discovery
This feature is used to detect network devices that are up (active). This is also used to detect Linux servers when troubleshooting applications. Configure subnet range to discover all authorized and unauthorized devices on the network.
Nmap sends a variety of different probes by default to maximize host detection. Nmap sends ARP request probes for host discovery on a local subnet since it is faster and unaffected by ICMP filtering. Nmap also sends default probes for device detection on remote subnets and for firewall traversal. This includes ICMP echo ping (-PE), SYN probe (-PS443), and ACK probe (-PA80) when -sn option only is used.
There is UDP probe (-PU) as well that can be added to include discovery based on UDP ports. This probe is used when a firewall is blocking ICMP and TCP for example. The <target> can be IP address, subnet, subnet range, or hostname.
Right-click Ubuntu server and select console to login with credentials shown.
username: cisco
password: cisco
clear
Right-click Ubuntu client and select console to login with credentials shown.
username: cisco
password: cisco
clear
Nmap command line option (-sn) disables default port scan for faster discovery and to avoid IDS/IPS alerts. ICMP probe (-PE) is echo pings that work well however probe fail when ICMP is blocked at firewalls or servers. SYN probes (-PS22,443) are effective for traversing firewalls since SSH and HTTPS are often allowed. The response from host does not confirm that a port is open. Finally –reason option returns an explanation of why Nmap thinks host or network device is up.
Cisco Devices
Copy and paste Nmap command to Ubuntu client to scan Cisco devices.
sudo nmap -sn -PE -PS22,443 --reason 192.168.255.0/24
Nmap Results
Starting Nmap 7.94SVN ( https://nmap.org ) at 2026-02-20 15:18 UTC
Nmap scan report for 192.168.255.1
Host is up, received echo-reply ttl 253 (0.0052s latency).
Nmap scan report for 192.168.255.2
Host is up, received echo-reply ttl 255 (0.0015s latency).
Nmap scan report for 192.168.255.3
Host is up, received echo-reply ttl 254 (0.0029s latency).
Nmap done: 256 IP addresses (3 hosts up) scanned in 4.79 seconds
Linux Servers
Copy and paste Nmap command to Ubuntu client to scan Linux server.
sudo nmap -sn -PE -PS22,443 --reason 192.168.200.1
Nmap Results
Starting Nmap 7.94SVN ( https://nmap.org ) at 2026-02-20 15:28 UTC
Nmap scan report for 192.168.200.1
Host is up, received echo-reply ttl 61 (0.0065s latency).
Nmap done: 1 IP address (1 host up) scanned in 0.10 seconds
Lab 2: Port Scanning
This is the most common usage of Nmap to detect open ports on network devices and servers. The purpose of port scanning is to verify all open ports listening for incoming connections. It does not tell you the root cause when troubleshooting since issue could be ACL, firewall, routing blackhole, or interface down
Nmap port scanning is used to detect open (listening) ports on a server or network device. There are also closed ports and filtered ports detected. Nmap default is to scan TCP ports only unless UDP is specified. The report would list service (https), port number (443), and status (open) for example. Port scanning is used for a variety of purposes such as vulnerability and firewall testing. You could scan a subnet for unauthorized web servers (80/443/8080) for example.
SYN scan method is the default when network engineer has sudo privilege. Nmap can disable host discovery (-Pn) for port scanning if a firewall is filtering ICMP pings. This prevents firewall detection and maximizes host port detection. Nmap classifies port as open (listening), closed, or filtered with firewall or an access control list.
-sS (SYN Scan)
This is stealthier than TCP connect scan since host sends RST to close connection. Detects filtering of TCP ports on a firewall and open ports listening on server or network device. Linux sudo privilege is required for this scan type.
| STATE | Reason | Meaning |
|---|---|---|
| closed | reset-received | Host responded with RST → port is not listening, but reachable |
| open | tcp-reset (syn-ack) | Host responded with SYN-ACK → port is listening |
| filtered | no-response | Firewall/ACL silent drops packets → unknown if port is open |
*closed (service is not bound to port)
*filtered (no-response or icmp-host-prohibited)
-sU (UDP scan)
This is required to scan UDP ports (DNS, SNMP, etc) that are open on Cisco devices or network servers.
UDP reply → open
ICMP port unreachable → closed
ICMP filtered error → filtered
No response → open|filtered (most common when firewall/acl filtering port)
-sT (TCP Connect Scan)
Detect filtering of TCP ports on a firewall and open ports listening on server or network device. This does the complete TCP handshake and is much slower.
-sV (Service detection)
Detects the application software version for services such as NTP, SSH, and DNS.
-Pn (port scan only)
This tells Nmap to skip host discovery and do port scan only. The advantage is speed when doing limited scan and traversing firewall where probes could be filtered.
The following are port scanning examples for Cisco devices and Linux servers. Copy and paste each Nmap command to Ubuntu client separately to run individual test.
Linux Servers
This command scans common TCP/UDP ports on Linux server (1-2 minutes).
sudo nmap -Pn -sS -sU -sV -p T:21,22,80,443,U:53,67,68,69,161 192.168.200.1 -v
Nmap Results
Starting Nmap 7.94SVN ( https://nmap.org ) at 2026-02-20 15:31 UTC
NSE: Loaded 46 scripts for scanning.
Initiating Parallel DNS resolution of 1 host. at 15:31
Completed Parallel DNS resolution of 1 host. at 15:31, 0.04s elapsed
Initiating SYN Stealth Scan at 15:31
Scanning 192.168.200.1 [4 ports]
Discovered open port 443/tcp on 192.168.200.1
Discovered open port 80/tcp on 192.168.200.1
Discovered open port 22/tcp on 192.168.200.1
Completed SYN Stealth Scan at 15:31, 1.21s elapsed (4 total ports)
Initiating UDP Scan at 15:31
Scanning 192.168.200.1 [5 ports]
Discovered open port 161/udp on 192.168.200.1
Completed UDP Scan at 15:31, 1.62s elapsed (5 total ports)
Initiating Service scan at 15:31
Scanning 7 services on 192.168.200.1
Service scan Timing: About 62.50% done; ETC: 15:34 (0:00:58 remaining)
Completed Service scan at 15:33, 102.62s elapsed (8 services on 1 host)
NSE: Script scanning 192.168.200.1.
Initiating NSE at 15:33
Completed NSE at 15:33, 2.59s elapsed
Initiating NSE at 15:33
Completed NSE at 15:33, 1.05s elapsed
Nmap scan report for 192.168.200.1
Host is up (0.0086s latency).
PORT STATE SERVICE VERSION
21/tcp filtered ftp
22/tcp open ssh OpenSSH 9.6p1 Ubuntu 3ubuntu13.5 (Ubuntu Linux; protocol 2.0)
80/tcp open http nginx 1.24.0 (Ubuntu)
443/tcp open ssl/http nginx 1.24.0 (Ubuntu)
53/udp open|filtered domain
67/udp open|filtered dhcps
68/udp open|filtered dhcpc
69/udp open|filtered tftp
161/udp open snmp SNMPv1 server; net-snmp SNMPv3 server (public)
Service Info: Host: server; OS: Linux; CPE: cpe:/o:linux:linux_kernel
Read data files from: /usr/bin/../share/nmap
Service detection performed. Please report any incorrect results at https://nmap.org/submit/ .
Nmap done: 1 IP address (1 host up) scanned in 109.72 seconds
Raw packets sent: 19 (1.357KB) | Rcvd: 5 (349B)
Cisco TCP Attack Surface Scan
This command does TCP attack surface scan of R1 router (30-40 seconds).
sudo nmap -Pn -sS --open -p- 192.168.255.1
Nmap Results
Starting Nmap 7.94SVN ( https://nmap.org ) at 2026-02-20 16:08 UTC
Nmap scan report for 192.168.255.1
Host is up (0.0070s latency).
Not shown: 44884 closed tcp ports (reset), 20649 filtered tcp ports (no-response)
Some closed ports may be reported as filtered due to –defeat-rst-ratelimit
PORT STATE SERVICE
22/tcp open ssh
53/tcp open domain
Nmap done: 1 IP address (1 host up) scanned in 33.57 seconds
Cisco TCP/UDP Full Attack Surface Scan
This command does TCP/UDP full attack surface scan of R1 router (30-40 seconds).
sudo nmap -Pn -sS -sU --open -p T:1-65535,U:53,67,68,69,123,161,500,4500 192.168.255.1
Nmap Results
Starting Nmap 7.94SVN ( https://nmap.org ) at 2026-02-20 16:15 UTC
Nmap scan report for 192.168.255.1
Host is up (0.0098s latency).
Not shown: 42596 closed tcp ports (reset), 22938 filtered tcp ports (no-response), 5 filtered udp ports (port-unreach)
Some closed ports may be reported as filtered due to –defeat-rst-ratelimit
PORT STATE SERVICE
53/tcp open domain
53/udp open domain
123/udp open ntp
161/udp open snmp
Nmap done: 1 IP address (1 host up) scanned in 41.70 seconds
Cisco DNS Server Scan
This command scans the network for any Cisco DNS servers (15-20 seconds).
sudo nmap -Pn -sV -p 53 --open 192.168.255.0/24
Nmap Results
Starting Nmap 7.94SVN ( https://nmap.org ) at 2026-02-20 17:16 UTC
Nmap scan report for 192.168.255.1
Host is up (0.043s latency).
PORT STATE SERVICE VERSION
53/tcp open domain Unbound 1.4.22
Service detection performed. Please report any incorrect results at https://nmap.org/submit/ .
Nmap done: 256 IP addresses (256 hosts up) scanned in 23.86 seconds
Cisco Telnet Scan
This command scans Cisco devices to detect where Telnet is enabled.
sudo nmap -Pn -p 23 --open 192.168.255.0/24
Nmap Results
Starting Nmap 7.94SVN ( https://nmap.org ) at 2026-02-20 17:19 UTC
Nmap scan report for 192.168.255.2
Host is up (0.0043s latency).
PORT STATE SERVICE
23/tcp open telnet
Nmap scan report for 192.168.255.3
Host is up (0.0055s latency).
PORT STATE SERVICE
23/tcp open telnet
Nmap done: 256 IP addresses (256 hosts up) scanned in 17.52 seconds
Cisco SSH Scan
This command scans Cisco devices to verify where SSH is enabled.
sudo nmap -Pn -sV -p 22 --open 192.168.255.0/24
Nmap Results
Starting Nmap 7.94SVN ( https://nmap.org ) at 2026-02-20 17:24 UTC
Nmap scan report for 192.168.255.1
Host is up (0.0069s latency).
PORT STATE SERVICE VERSION
22/tcp open ssh Cisco SSH 1.25 (protocol 2.0)
Service Info: OS: IOS; CPE: cpe:/o:cisco:ios
Nmap scan report for 192.168.255.2
Host is up (0.0036s latency).
PORT STATE SERVICE VERSION
22/tcp open ssh Cisco SSH 1.25 (protocol 2.0)
Service Info: OS: IOS; CPE: cpe:/o:cisco:ios
Nmap scan report for 192.168.255.3
Host is up (0.0053s latency).
PORT STATE SERVICE VERSION
22/tcp open ssh Cisco SSH 1.25 (protocol 2.0)
Service Info: OS: IOS; CPE: cpe:/o:cisco:ios
Service detection performed. Please report any incorrect results at https://nmap.org/submit/ .
Nmap done: 256 IP addresses (256 hosts up) scanned in 12.97 seconds
TCP Handshake Connection Test
This command does a TCP handshake connection test to Linux server and scans specific TCP ports on server.
sudo nmap -Pn -sT -p 21,22,80,443 192.168.200.1
Nmap Results
Starting Nmap 7.94SVN ( https://nmap.org ) at 2026-02-20 17:29 UTC
Nmap scan report for 192.168.200.1
Host is up (0.0095s latency).
PORT STATE SERVICE
21/tcp filtered ftp
22/tcp open ssh
80/tcp open http
443/tcp open https
Nmap done: 1 IP address (1 host up) scanned in 1.34 seconds
cURL Application Connection Test
This client command does an HTTP application connection test to Linux server.
curl -I -L http://192.168.200.1 -v
cURL SSL Certificate Test
This client command does HTTPS connection test to Linux server (ignore SSL certificate error).
curl -k https://192.168.200.1 -v
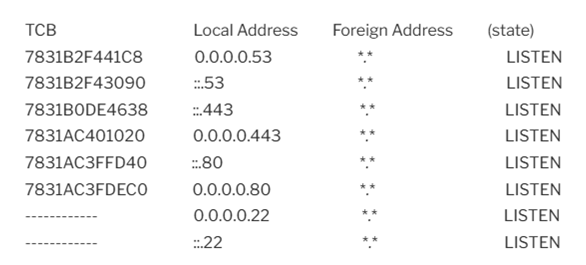
Cisco TCP Listening Ports
This IOS command displays all TCP listening ports on R1 router.
R1#show tcp brief all
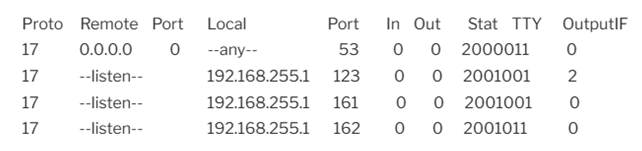
Cisco UDP Listening Ports
This IOS command lists all UDP listening ports on R1 router.
R1#show udp
Linux Server TCP Listening Ports
This server command displays TCP listening ports on Linux server.
ss -tln |grep LISTEN
Linux Server UDP Listening Ports
This server command displays UDP listening ports on Linux server.
ss -uln |grep UNCONN
Lab 3: ACL Validation (-sA)
The following Nmap commands are used to test and verify Cisco ACLs on R1. Nmap sends traffic to Linux server and tests a range of application ports to identify what is filtered. The following extended ACL is configured on R1 however it is not currently applied to any interface.
R1#show access-list
Extended IP access list 100
10 deny tcp any any eq ftp
20 deny tcp any any eq www
30 deny udp any any eq tftp
40 deny udp any any eq snmp
50 permit ip any any
Host firewall on Ubuntu server is inactive and currently permitting all traffic by default. Apply ACL 100 inbound on R1 interface E0/2 before starting tests so it is active.
interface E0/2
ip access-group 100 in
Cisco TCP ACL Custom Scan
This command performs ACK scan of TCP port range 1-1024 to identify any ports that ACL is filtering on R1. Nmap sends packets to Linux server since they have to traverse R1. Copy and paste this command to Ubuntu client to run test.
sudo nmap -Pn -sA -p 21,22,80,443 192.168.200.1
Starting Nmap 7.94SVN ( https://nmap.org ) at 2026-02-20 23:41 UTC
Nmap scan report for 192.168.200.1
Host is up (0.0054s latency).
PORT STATE SERVICE
21/tcp filtered ftp
22/tcp unfiltered ssh
80/tcp filtered http
443/tcp unfiltered https
Nmap done: 1 IP address (1 host up) scanned in 1.37 seconds
Cisco TCP ACL Full Scan
This command performs a full ACK scan of TCP port range 1-1024 to identify any ports that ACL is filtering on R1. Testing of all TCP ports is done to detect misconfiguration of open ports that should be filtered. Copy and paste this command to Ubuntu client to run test.
sudo nmap -Pn -sA -p 1-1024 192.168.200.1
Starting Nmap 7.94SVN ( https://nmap.org ) at 2026-02-20 23:46 UTC
Nmap scan report for 192.168.200.1
Host is up (0.011s latency).
Not shown: 1019 filtered tcp ports (no-response), 2 filtered tcp ports (admin-prohibited)
PORT STATE SERVICE
22/tcp unfiltered ssh
161/tcp unfiltered snmp
443/tcp unfiltered https
Nmap done: 1 IP address (1 host up) scanned in 5.21 seconds
Cisco UDP ACL Custom Scan
This command performs scan of selected UDP ports to identify any ports that ACL is filtering on R1 router. Copy and paste this command to Ubuntu client to run test that will take 100 seconds.
sudo nmap -Pn -sV -sU -p 53,67,68,69,123,161 192.168.200.1
Starting Nmap 7.94SVN ( https://nmap.org ) at 2026-02-20 23:56 UTC
Nmap scan report for 192.168.200.1
Host is up (0.0053s latency).
PORT STATE SERVICE VERSION
53/udp open|filtered domain
67/udp open|filtered dhcps
68/udp open|filtered dhcpc
69/udp filtered tftp
123/udp open|filtered ntp
161/udp filtered snmp
Service detection performed. Please report any incorrect results at https://nmap.org/submit/ .
Nmap done: 1 IP address (1 host up) scanned in 106.75 seconds
Remove Cisco ACL From Interface E0/0
Remove ACL 100 from R1 interface E0/2 to reset normal lab conditions.
interface E0/2
no ip access-group 100 in
| Nmap Result | Description (TCP ACLs) |
|---|---|
| unfiltered | ACL/firewall allows the TCP traffic |
| filtered | ACL/firewall blocks the TCP traffic |
| Nmap Result | Description (UDP ACLs) |
|---|---|
| open | An application responded on that UDP port |
| closed | The host/device replied with ICMP Port Unreachable |
| open filtered | No response at all → could be open or blocked by an ACL/firewall |
Lab 4: Firewall Rule Analysis (-sA)
Nmap -sA flag can be used to verify whether TCP firewall rules are functioning as intended. The firewall sends TCP RST packet that occurs when a firewall rule is filtering TCP ports. This command does not verify whether the port is listening on a server or network device There is also testing of UDP firewall rules with -sU flag. UDP scan can also verify listening ports on a server or network device. Configure a slower scan with -T0 or –T1 to prevent IDS/IPS scan detection. The report output will show port on firewall as open or filtered with a rule.
This lab is based on a firewall configured on the Ubuntu server however the same testing applies to appliance-based firewalls as well. It is recommended to do firewall rule scan from inside and outside security zones.
Copy and paste the following host firewall rules to Ubuntu server and activate for testing.
sudo ufw status
sudo ufw allow ssh
sudo ufw allow https
sudo ufw allow http
sudo ufw allow snmp
sudo ufw enable
sudo ufw status
The following commands perform firewall rule analysis for TCP/UDP ports. Copy and paste each Nmap command to Ubuntu client separately to start individual tests.
Host Firewall Custom TCP Port Scan
This command scans selected TCP ports 21 (FTP), 22 (SSH), 80 (HTTP), and 443 (HTTPS) to perform firewall rule analysis.
sudo nmap -Pn -sA--reason -p 21,22,80,443 192.168.200.1 -v
Nmap Results
Starting Nmap 7.94SVN ( https://nmap.org ) at 2026-02-21 03:29 UTC
Nmap scan report for 192.168.200.1
Host is up, received user-set (0.0068s latency).
PORT STATE SERVICE REASON
21/tcp filtered ftp no-response
22/tcp unfiltered ssh reset ttl 61
80/tcp unfiltered http reset ttl 61
443/tcp unfiltered https reset ttl 61
Nmap done: 1 IP address (1 host up) scanned in 1.78 seconds
Host Firewall Full TCP Port Scan
This command scans all TCP ports to perform firewall rule analysis.
sudo nmap -Pn -sA--reason -p 1-1024 192.168.200.1 -T4 -oN tcp_firewall_scan.txt
Nmap Results
Starting Nmap 7.94SVN ( https://nmap.org ) at 2026-02-21 03:36 UTC
Nmap scan report for 192.168.200.1
Host is up, received user-set (0.0081s latency).
Not shown: 1021 filtered tcp ports (no-response)
PORT STATE SERVICE REASON
22/tcp unfiltered ssh reset ttl 61
80/tcp unfiltered http reset ttl 61
443/tcp unfiltered https reset ttl 61
Nmap done: 1 IP address (1 host up) scanned in 4.99 seconds
Host Firewall Top UDP Port Scan
This command scans top UDP ports to perform firewall rule analysis.
sudo nmap -Pn -sU--reason -p 53,67,68,69,88,123,161,162,319,320,500,1812,1813,2055,4500,4789,5060,5061,5246,5247,12346 192.168.200.1 -oN udp_firewall_scan.txt -v
Nmap Results
Starting Nmap 7.94SVN ( https://nmap.org ) at 2026-02-21 03:44 UTC
Nmap scan report for 192.168.200.1
Host is up, received user-set (0.019s latency).
PORT STATE SERVICE REASON
53/udp open|filtered domain no-response
67/udp open|filtered dhcps no-response
68/udp open|filtered dhcpc no-response
69/udp open|filtered tftp no-response
88/udp open|filtered kerberos-sec no-response
123/udp open|filtered ntp no-response
161/udp open snmp udp-response ttl 61
162/udp open|filtered snmptrap no-response
319/udp open|filtered ptp-event no-response
320/udp open|filtered ptp-general no-response
500/udp open|filtered isakmp no-response
1812/udp open|filtered radius no-response
1813/udp open|filtered radacct no-response
2055/udp open|filtered iop no-response
4500/udp open|filtered nat-t-ike no-response
4789/udp open|filtered unknown no-response
5060/udp open|filtered sip no-response
5061/udp open|filtered sip-tls no-response
5246/udp open|filtered capwap-control no-response
5247/udp open|filtered capwap-data no-response
12346/udp open|filtered unknown no-response
Nmap done: 1 IP address (1 host up) scanned in 1.68 seconds
Reset Host Firewall Rules
Reset server firewall to inactive after firewall testing with this command.
sudo ufw reset
TCP Scan Results
| STATE | Reason | Description |
|---|---|---|
| filtered | no-response | Firewall/ACL drops packets; cannot tell if service is listening |
| unfiltered | reset-received | Firewall/ACL allows packets, host sends RST → service closed |
| unfiltered | reset-received | Firewall/ACL allows packets, service closed |
| Packet sent | Response | Description |
|---|---|---|
| TCP ACK to port | RST | Port is unfiltered (reachable through firewall) |
| TCP ACK | No response / filtered | Port is filtered (blocked by firewall) |
UDP Scan Results
| Nmap state | Reason | Description |
|---|---|---|
| open | udp-response | Service replied → port open |
| closed | icmp-port-unreachable | Host reachable, service not running |
| open filtered | no-response | Service open or firewall silently dropped packet |
| filtered | icmp-unreachable | Firewall actively blocked traffic |
Root/Administrator Privilege (sudo)
The default TCP port scan detection method is a SYN scan (-sS) when network engineer has root/administrator privilege. It requires raw socket access and the reason for root/administrator (sudo) privilege.This is a faster stealthy scan that only sends SYN packets and does not complete the TCP handshake, making it faster and less detectable by firewalls and IDS/IPS. UDP port scan when requested sends application data to each service to verify port status.
Non-Root/Administrator Privileges
Nmap will default to using a TCP Connect scan (-sT) and complete the full TCP handshake (SYN, ACK, FIN), which is more detectable but works without sudo privileges. This method relies on the operating system networking stack to establish full TCP connection. This scan is easier to detect by firewalls since it establishes a TCP connection.
Service Detection
Nmap will scan top 1000 most common TCP ports by default for service versions of applications. The default service detection scan returns TCP application name, port number, and version (443/tcp open https nginx 1.27.4) for example. There is an option to include top 1000 most common UDP ports as well or all TCP / UDP ports.
OS Fingerprinting
Nmap will scan all hosts to detect the operating system and version. This is designed mostly for Windows and Linux servers. OS Fingerprinting identifies the operating system based on the network stack and behavior of TCP and UDP protocols. Scan all TCP and UDP ports with OS fingerprinting for most accurate results.
Nmap Command Line Options
-sn : host discovery only (no default port scan)
-Pn: default port scan only (disable host discovery)
-n: disable reverse DNS resolution for faster testing
-R: perform reverse DNS resolution
-sV : Service version detection
-O : OS fingerprint detection
-A : Aggressive scan (includes OS, version, script scan, and traceroute)
-p <port> : Specify ports to scan
-p- : Scan all 65,535 TCP ports
-sS : TCP SYN scan (stealth scan)
-sT : TCP Connect scan
-sU : UDP port scan
-sA : TCP ACK port scan
-sW : TCP window scan
-F : faster scan (top 100 most common TCP ports)
–top-ports <N> : Scan the top N most common ports
-T<0-5> : Set timing template (0 = slow, 5 = fast)
-v : Verbose output (also –vv and –vvv for added details)
–script=<script name> : Run specific NSE scripts